Some time ago i was working on windows and development environment using XAMPP. I felt like windows is working a little bit slower, so I have searched for solution for this but did not get nothing for speeding up the system + development tools, But, what I get everywhere is, Ubuntu is faster than windows, on behalf of this i have decided to switch my development environment on Ubuntu.
Before starting to setup Ubuntu on my system, I have read many blogs and articles. I have collected all required information for installing Ubuntu and setting up development environment. Here, i am going to share all the step you have to follow for setting up development environment on Ubuntu.
you are a developer and you have to be feel like a real developer with a platform which gives you this feel-good-factor.
Firstly you have to install Ubuntu on your system, for installing you can to follow these guidelines Install Ubuntu. If you are using Windows and you want to setup Development Environment on Ubuntu then these steps will helps you in setting up the new environment for you.
You have two choices here, one is completely clean your system and install Ubuntu, but this is not a feasible thing because through this all of your previous work will be cleaned and the other is, you can install an Additional OS (Ubuntu) on your system in a different Disk Drive.
For Installing Ubuntu with Windows, Go to “Windows Installer for Ubuntu Desktop” ==> http://www.ubuntu.com/download/desktop/windows-installer
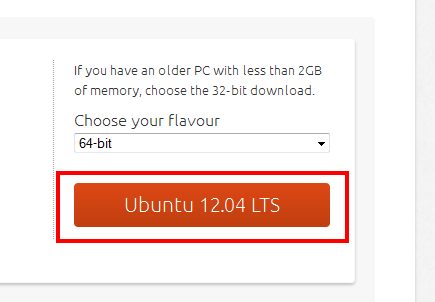

Click to “Get the Installer” and download the Installer.

Click on Save.
Go to the directory where you have downloaded the Ubuntu windows installer. Double click the “wubi.exe” (Probably name of file and may be differing if Ubuntu Community has changed this name).
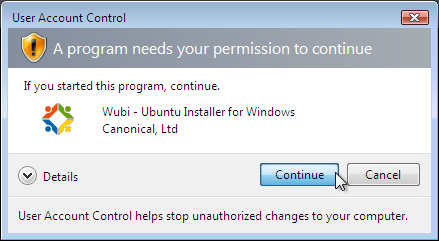
Click to Continue.
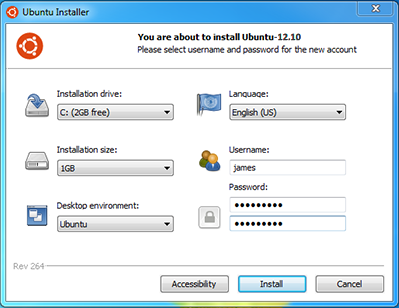
It will prompt you some details to be filled “Installation Drive” ==> “Select disk drive where you want to install Ubuntu.” “Installation Size” ==> “Size for the Ubuntu System, if you are giving lower size then you will not be able to install more packages on your Ubuntu system.” “Development Environment” ==> “Select appropriate development environment.” “Language” ==> “Select comfortable language to you.” “User Name” ==> “Enter Desired User Name (Remember user name must differ from your window’s users).” “Password” ==> “Enter a secure and complex password.”
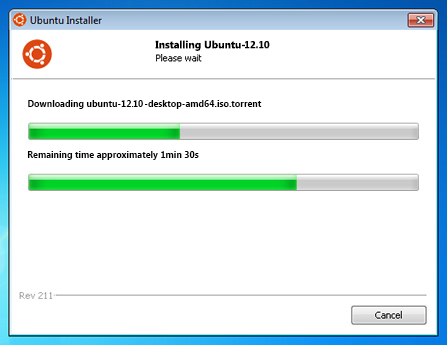
Click to “Install” and the Ubuntu installation will start, the installer automatically downloads the Ubuntu latest LTS version and install it.
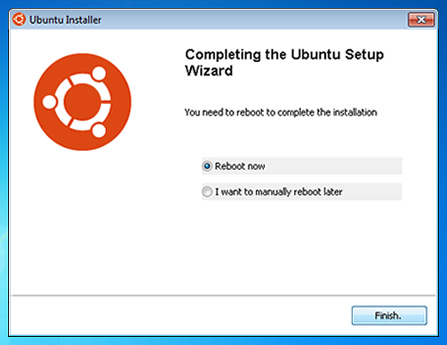
After installation system ask you to reboot the system, when you reboot your system and your system will prompt you to select the OS.
or you can follow instructions from http://www.ubuntu.com/download/desktop/install-ubuntu-with-windows
So, now you are running your system with Ubuntu and its the time to feel like a real developer because now you will enjoy the commands power with a faster system.
The Next Question Comes in your mind is you are running only Ubuntu but what about the development environment? So, the following steps will get you towards to setting up the development environment. For PHP development environment setup you requires the following Packages :
Before installing any package to your system, please run this command sudo apt-get update this will update all the package list, Remember this will not install updated version of all packages, it is Used to re-synchronize the package index files from their sources. The indexes of available packages are fetched from the location(s) specified in /etc/apt/sources. List (5). An update should always be performed before an upgrade or dist-upgrade.
Install Apache : If you are a developer then you are familiar with Apache, if not ? then for now you can assume this like a server, this will provides the ability to setup your own server on your local system. For installing Apache, Open the terminal (Alt + Crtl + t) and run the following command
sudo apt-get install apache2
Meaning of this command is :
Advanced Packaging Tool (APT) SUDO( SU => stands for Super User of your system and DO => stands for Take an Action.)
So, by running this command, As a “Super User” you are telling Ubuntu to install “Apache Package” into your system with help of APT.
This command will install Apache in your system, you can check it is working or not with the help of your browser. Open Browser and type “localhost” and press “Enter”, if you will see the following screen means your Apache server is running properly. Install PHP
sudo apt-get install php5
sudo apt-get install libapache2-mod-php5
Or you can install both of these in a single command, like this
sudo apt-get install php5 libapache2-mod-php5
This command will install PHP and Required modules for Apache.
Install MySql
sudo apt-get install mysql-server libapache2-mod-auth-mysql php5-mysql
This command will install MySql Server and Required modules.
Install PHPMyAdmin
sudo apt-get install phpmyadmin (asks for user name and password of system and later for database).
This command will install PhpMyAdmin, Now you have to add an interface for phpMyAdmin which will facilitates you to use MySql server from a web-based interface.
For setup up a web-based UI follow these steps :
create a directory named "pma" in "/var/www/"
For creating directory you have run these commands

cd /var/www/
sudo mkdir pma (asks for password of the system)
cd pma
sudo chmod 777 -R .(this will sets rwx permissions to this folder).
Now you have to download a package from http://www.phpmyadmin.net/home_page/downloads.php
Download .tar.gz file from here and extract all contents to “/var/www/pma/”. (Remember if compressed file have a single folder then you have to open that folder and all of its contents will be extracted to the previously created folder.).
now restart you apache server by the following command
sudo /etc/init.d/apache2 restart
Now open your browser and type “localhost/pma”, you will see a login area.
Now All necessary packages are in your system, So you can develop any PHP program with these, For developing anything you have to create all files in “/var/www/” (this is localhost of your system).
Hope this helped you to setup development environment on Ubuntu as well as Windows also up.
In my next post i will describe briefly how to install GIT/SVN, Skype, Sublime, Xdebug, Curl and how to run multiple instances of Skype.