Tinymce editor is quit famous, well known and very attractive editor these days. A few Days ago i worked with this editor and felt It is very customizable and easy to extend editor.
I am going to share how I customized it according to my requirements:
Main Moto of customization to add multilevel drop-down menu on a toolbar menu button.
I have done googling 2-3 hours and implemented the suggested solution by others but no one worked according to my requirements.
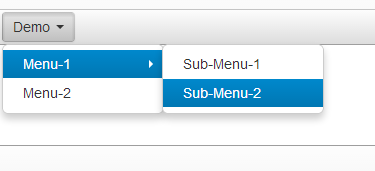
I have found only the way how to add single level drop-down menu button everywhere but my requirement is little bit different, What i wanting to do is a menu button like :
Firstly, i am going to tell you how to add a single level drop-down menu button,
Code for adding button on toolbar:
<script type="text/javascript">
tinymce.init({
selector: "textarea",

toolbar: "insertfile undo redo | styleselect | bold italic | alignleft aligncenter alignright alignjustify | bullist numlist outdent indent | link image | demo",

setup : function(editor)
{
editor.addButton('demo', {text : 'Demo', type : 'menubutton', icon : false});
}
});
</script>
This code will adds a button on the toolbar of tinymce editor.
For adding menu items to the button, you have to use the following code:
<script type="text/javascript">
tinymce.init({
    selector: "textarea",
    toolbar: "insertfile undo redo | styleselect | bold italic | alignleft aligncenter alignright alignjustify | bullist numlist outdent indent | link image | demo",
    setup: function(editor){
        editor.addButton('demo',
        {
            text: 'Demo',
            type: 'menubutton',
            icon: false,
            menu: [
                {
                    text: 'Menu-1',
                    onclick: function(){
                        alert("Clicked on Menu-1.");
                    }
                },
                {
                    text: 'Menu-2',
                    onclick: function(){
                        alert("Clicked on Menu-2.");
                    }
                }
            ]
        });
    }
});
</script>
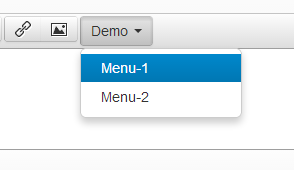
The above code will adds a menu button with two menu items.
Now the point comes, How to add submenu items to these menu items ?
No need to worry its quite simple, you can use the following code for this:
<script type="text/javascript">
tinymce.init({
    selector: "textarea",
    toolbar: "insertfile undo redo | styleselect | bold italic | alignleft aligncenter alignright alignjustify | bullist numlist outdent indent | link image | demo",
    setup: function(editor){
        editor.addButton('demo',
        {
            text: 'Demo',
            type: 'menubutton',
            icon: false,
            menu: [
                {
                    text: 'Menu-1',
                    onclick: function(){
                        alert("Clicked on Menu-1.");
                    },
                    menu: [
                        {
                            text: 'Sub-Menu-1',
                            onclick: function(){
                                alert("Clicked on Sub-Menu-1.");
                            }
                        },
                        {
                            text: 'Sub-Menu-2',
                            onclick: function(){
                                alert("Clicked on Sub-Menu-2.");
                            }
                        },

                    ]
                },
                {
                    text: 'Menu-2',
                    onclick: function(){
                        alert("Clicked on Menu-2.");
                    }
                }
            ]
        });
    }
});
</script>
This code will adds submenu items to the Menu-1 as shown below.
Note : What you have to remember is :
-
If you will notice all above code snippet then you will find a argument “toolbar” passed to tinymce.init(). This argument specifies the buttons will be shown on the toolbar, what will be their order, and separator for button groups.
-
If you will not add your button’s name here then that will not visible on the editor’s toolbar.
-
Here, the thing comes in your mind is : what is the name of the button you are going to add?
  editor.addButton(name, settings),
/* the addButton function expects first argument as the name and the other one as the settings of that button.*/
In my above codes you can find the name of the button is : “demo”. This is not the all i have customized, I will let you know how to create a plug-in for tinynce editor.
If you have any doubt, you are most welcome to comment.


