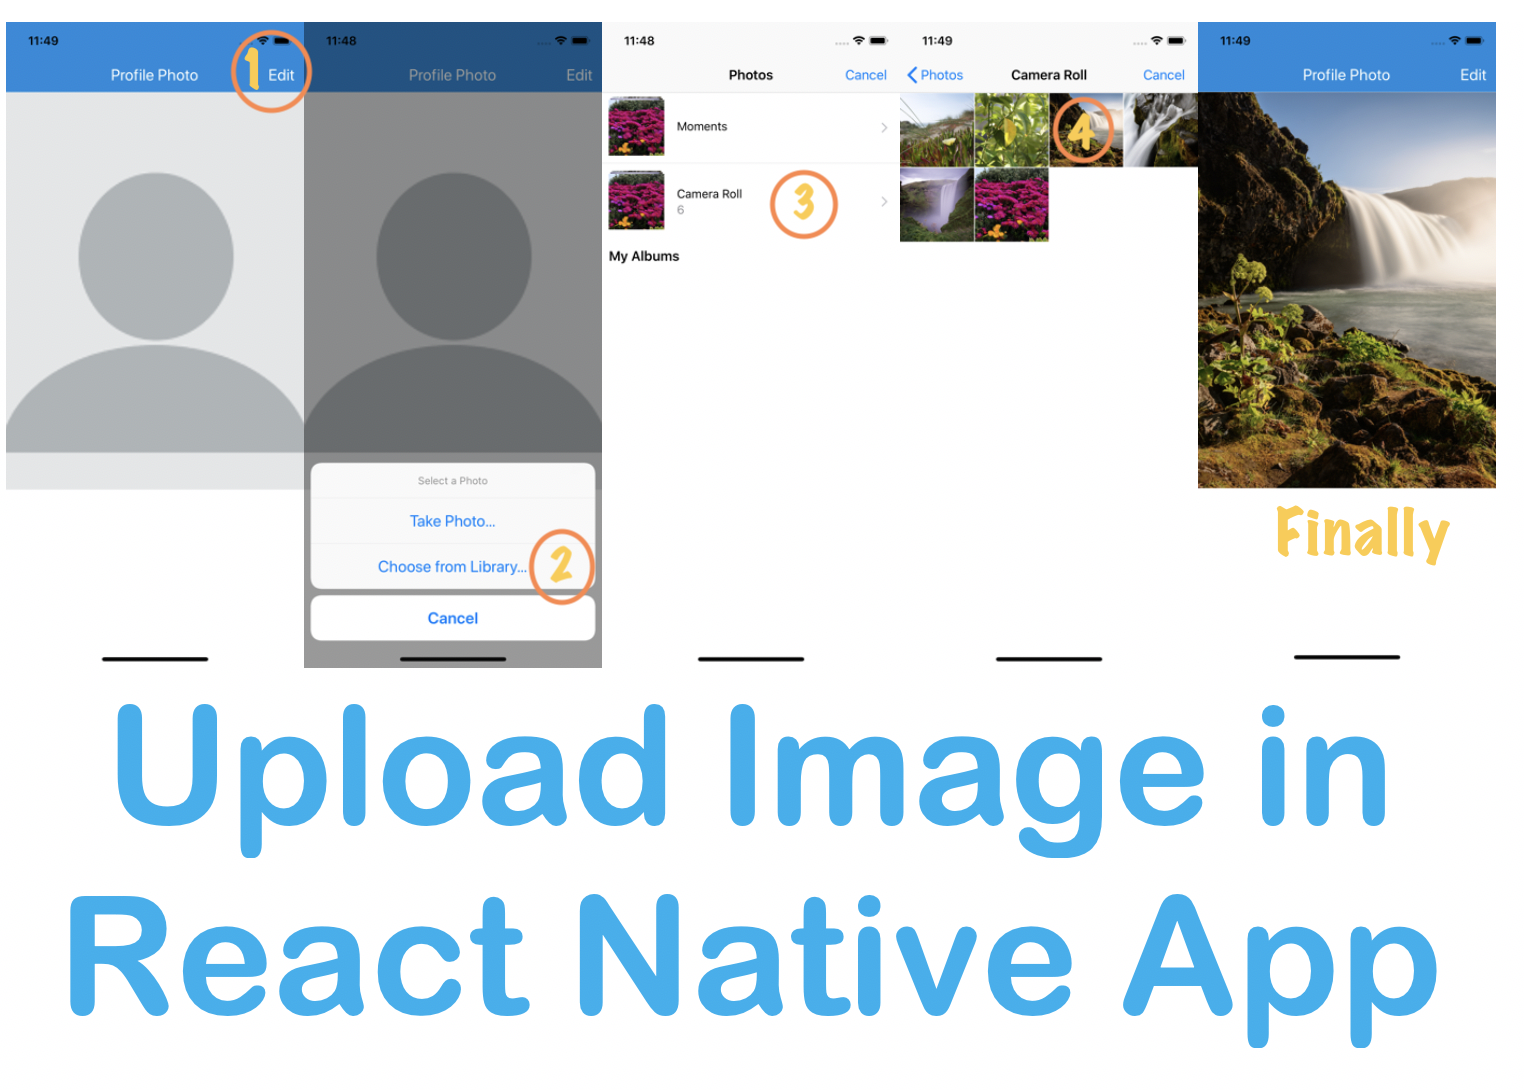
Images play a big role to create beautiful apps. Today we will learn how to upload image in React Native App.
Setup
To upload image we need to create two Project.
- A React Native app
- A simple node server (where we upload the selected image)
1 First we will set up a react native app.
react-native init ImageUploadReactNative
It will create a react native app with name ImageUploadReactNative
then run app in ios
cd ImageUploadReactNative;
cd ios // go to ios folder
pod install // pod install
cd.. // then back to current folder
Then we start our app for ios
reac-native run-ios
and for android we run this command.
reac-native run-android
Then in simulator it will look like below .

Now add a Image container and Edit Button
Ok now i am changing app.js and adding
- A Edit Button - when we click on this button we trigger image picker by this we can choose image which we want to upload.
- A Image Container - on which we will show image. By default we are showing a default image and when we choose another image using picker it will replace this default image.
So first create this edit button and image container.
App.js
import React from 'react';
import {Header, Image} from 'react-native-elements';
import {StyleSheet, View, ActivityIndicator} from 'react-native';
import defaultAvatar from './profile.png';

const App = () => {
  return (
    <View>
      <Header
        centerComponent={{
          text: 'Profile Photo',
          style: styles.headerText,
        }}
        rightComponent={{
          text: 'Edit',
          style: styles.headerText,
        }}
      />
      <View style={styles.imageContainer}>
        <Image
          source={defaultAvatar}
          PlaceholderContent={<ActivityIndicator />}
          style={{width: 400, height: 400}}
        />
      </View>
    </View>
  );
};

const styles = StyleSheet.create({
  container: {
    flex: 1,
    alignItems: 'center',
    justifyContent: 'center',
    height: '100%',
  },
  imageContainer: {
    flex: 1,
    alignItems: 'center',
    justifyContent: 'center',
  },
  headerText: {
    color: '#fff',
    fontSize: 20,
  },
  body: {flex: 1},
});

export default App;
And Now its look like below.

SetUp Image Picker to choose Image in React Native App
So Now, To upload image we are using react-native-image-picker npm package.
to use this package
yarn add react-native-image-picker

# RN >= 0.60
cd ios && pod install

# RN < 0.60
react-native link react-native-image-picker
and after this you need to do several steps for iOS and Android
iOS
Add the NSPhotoLibraryUsageDescription, NSCameraUsageDescription, NSPhotoLibraryAddUsageDescription and NSMicrophoneUsageDescription (if allowing video) keys to your Info.plist with strings describing why your app needs these permissions.
Note: You will get a SIGABRT crash if you don’t complete this step
<plist version="1.0">
  <dict>
    ...
    <key>NSPhotoLibraryUsageDescription</key>
    <string>$(PRODUCT_NAME) would like access to your photo gallery</string>
    <key>NSCameraUsageDescription</key>
    <string>$(PRODUCT_NAME) would like to use your camera</string>
    <key>NSPhotoLibraryAddUsageDescription</key>
    <string>$(PRODUCT_NAME) would like to save photos to your photo gallery</string>
    <key>NSMicrophoneUsageDescription</key>
    <string>$(PRODUCT_NAME) would like to use your microphone (for videos)</string>
  </dict>
</plist>
Android
Add the required permissions in AndroidManifest.xml:
<uses-permission android:name="android.permission.CAMERA" />
<uses-permission android:name="android.permission.WRITE_EXTERNAL_STORAGE"/>
So your files will looks like below.

So Now in app.js first we import react-native-image-picker .
import ImagePicker from 'react-native-image-picker';
Then on Edit button click we call method handlePicker . So overall Code is in App.js
import React, {useState} from 'react';
import {Header, Image} from 'react-native-elements';
import {StyleSheet, View, ActivityIndicator} from 'react-native';
import defaultAvatar from './profile.png';
import ImagePicker from 'react-native-image-picker';

const App = () => {
  const [avatar, setAvatar] = useState(defaultAvatar);

  const handlePicker = () => {
    // console.log('edit');
    ImagePicker.showImagePicker({}, (response) => {
      console.log('Response = ', response);

      if (response.didCancel) {
        console.log('User cancelled image picker');
      } else if (response.error) {
        console.log('ImagePicker Error: ', response.error);
      } else if (response.customButton) {
        console.log('User tapped custom button: ', response.customButton);
      } else {
        setAvatar({uri: response.uri});
        // here we can call a API to upload image on server
      }
    });
  };

  return (
    <View>
      <Header
        centerComponent={{
          text: 'Profile Photo',
          style: styles.headerText,
        }}
        rightComponent={{
          text: 'Edit',
          style: styles.headerText,
          onPress: () => handlePicker(),
        }}
      />
      <View style={styles.imageContainer}>
        <Image
          source={avatar}
          PlaceholderContent={<ActivityIndicator />}
          style={{width: 500, height: 500}}
        />
      </View>
    </View>
  );
};

const styles = StyleSheet.create({
  container: {
    flex: 1,
    alignItems: 'center',
    justifyContent: 'center',
    height: '100%',
  },
  imageContainer: {
    flex: 1,
    alignItems: 'center',
    justifyContent: 'center',
  },
  headerText: {
    color: '#fff',
    fontSize: 20,
  },
  body: {flex: 1},
});

export default App;
setAvatar({uri: response.uri});
here we can call a API to upload image on server
2 Now Setup a Node JS server to upload selected image
So in second terminal we will execute these command to create node server
cd ImageUploadReactNative
mkdir server
cd server
mkdir images
npm init // answer the questions which comes on terminal
npm install --save express body-parser multer
touch index.js
Then in index.js we set this below code
index.js
const Express = require('express');
const multer = require('multer');
const bodyParser = require('body-parser');

const app = Express();
app.use(bodyParser.json());
app.use(bodyParser.urlencoded({extended: true}));
multer({
  limits: {fieldSize: 25 * 1024 * 1024},
});

const Storage = multer.diskStorage({
  destination(req, file, callback) {
    callback(null, './images');
  },
  filename(req, file, callback) {
    callback(null, `${file.fieldname}_${Date.now()}_${file.originalname}`);
  },
});

app.get('/', (req, res) => {
  res.status(200).send('to upload image use this  /api/upload.');
});

app.post('/api/upload', (req, res) => {
  let upload = multer({storage: Storage}).single('picture');
  upload(req, res, function (err) {
    if (!req.file) {
      return res.send('Please select an image to upload');
    } else if (err instanceof multer.MulterError) {
      return res.send(err);
    } else if (err) {
      return res.send(err);
    }
    // Display uploaded image for user validation
    res.send(req.file.path); // send uploaded image
  });
});

app.listen(3000, () => {
  console.log('App running on http://localhost:3000');
});
Now this is related to the server (Node.js) which is not in the scope of this tutorial.
Finally, you can run the Node Server
node index.js
so in react native code where we are calling setAvatar({uri: response.uri}); after that we send request to server so now overall code in app.js
import React, {useState} from 'react';
import {Header, Image} from 'react-native-elements';
import {StyleSheet, View, ActivityIndicator, Platform} from 'react-native';
import defaultAvatar from './profile.png';
import ImagePicker from 'react-native-image-picker';

const createFormData = (photo, body) => {
  const data = new FormData();

  data.append('photo', {
    name: photo.fileName,
    type: photo.type,
    uri:
      Platform.OS === 'android' ? photo.uri : photo.uri.replace('file://', ''),
  });

  Object.keys(body).forEach((key) => {
    data.append(key, body[key]);
  });

  return data;
};

const App = () => {
  const [avatar, setAvatar] = useState(defaultAvatar);
  const [title, setTitle] = useState('Profile Photo');
  const handlePicker = () => {
    ImagePicker.showImagePicker({}, (response) => {
      console.log('Response = ', response);

      if (response.didCancel) {
        console.log('User cancelled image picker');
      } else if (response.error) {
        console.log('ImagePicker Error: ', response.error);
      } else if (response.customButton) {
        console.log('User tapped custom button: ', response.customButton);
      } else {
        setAvatar({uri: response.uri});
        setTitle('Updating...'); // image start to upload on server so on header set text is 'Updating..'
        fetch('http://localhost:3000/api/upload', {
          method: 'POST',
          headers: new Headers({
            'Content-Type': 'application/x-www-form-urlencoded', //Specifying the Content-Type
          }),
          body: createFormData(response, {id: '123'}),
        })
          .then((data) => data.json())
          .then((res) => {
            console.log('upload succes', res);
            setTitle('Profile Photo');
            setAvatar({uri: response.image});
          })
          .catch((error) => {
            console.log('upload error', error);
            setTitle('Profile Photo');
          });
      }
    });
  };

  return (
    <View>
      <Header
        centerComponent={{
          text: title,
          style: styles.headerText,
        }}
        rightComponent={{
          text: 'Edit',
          style: styles.headerText,
          onPress: () => handlePicker(),
        }}
      />
      <View style={styles.imageContainer}>
        <Image
          source={avatar}
          PlaceholderContent={<ActivityIndicator />}
          style={{width: 500, height: 500}}
        />
      </View>
    </View>
  );
};

const styles = StyleSheet.create({
  container: {
    flex: 1,
    alignItems: 'center',
    justifyContent: 'center',
    height: '100%',
  },
  imageContainer: {
    flex: 1,
    alignItems: 'center',
    justifyContent: 'center',
  },
  headerText: {
    color: '#fff',
    fontSize: 20,
  },
  body: {flex: 1},
});

export default App;
So it’s Looks like below.
Please give your comments and suggestion below.
Thanks .