I am working on Microsoft Dynamics CRM 2013 currently, now I have two setup for working server 1 and server 2 as I can’t mention these name here. So now I need to have exact all template at server 2 as these are at server 1.I faced many problems to get all template at server 2. There are two way to transfer templates from one server to another.
-
Create one by one at server 2.
-
And may find a way to get them all by importing however.
I didn’t know how to export and import so I went with option first and created all 50 templates on server 2 same as on server 1 manually. But for doing all stuff , I had have to spent a lot of my time and attention because all letters have different settings i.e. margins (left, right, bottom and top), header logo, footer logo first page header etc.
Setting fixes were not a big deal also But letter may be in thousands of number. Then what?
So I thought I have to go with option second however and finally I found a way to do this in a very easy steps. I am getting a lot of pleasant and proud to share this way with all you guys who uses Microsoft Dynamics CRM and facing same problem.
There are some steps by following these steps you can do your job in a little bit moment and more accurately. Step 1: Go to server 2 setup in which you want to import template, stage setting whatever entity you want. Then follow below steps. There are two main tab in Microsoft Dynamics CRM 2013.
I. Workplace II. Setting For export data and then import them into another server. a) **(At Server1)** Go to Setting tab->Data Management->Templates for Data Import.
Click on “Templates for Data Import” and you will see a pop up, here you can choose your record type whatever you want to import data for i.e. I selected Template record type then go to “Download” link and download it you will get a file, please open it with excel so that you can see heading column exactly.
See Below Screen:
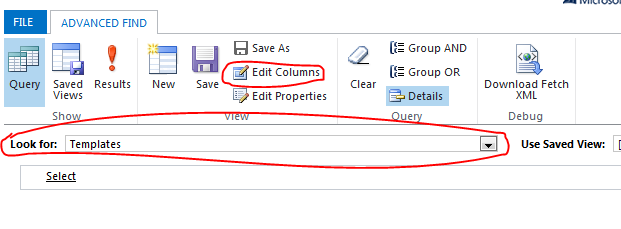
 b) (At Server2) Go to Workplace->ADVANCED FIND
See Below Screen:
 Now click this advanced find link, you will see a popup with a lot of options. Here you will see a drop down named “Look for” select any of them i. e. Templates. Now click on Edit Columns, again one more popup is there with heading Edit Columns and some links i.e. Add Columns, Remove, and two arrows for shifting header column.
See Below Screen:
 Now most important thing is that you have to prepare Heading Columns exactly same as in “Excel” which you download previously.
Process to make Heading Columns:
-
Use Arrow to shift inserted column left or right.
-
Use Add Columns link to add new options.
-
Use Remove button for extra added option (As mentioned previously you have to create exact header template).
See Below Screen:
 Now once you have done click on “Ok” button. Current popup will get closed. Now you are on First popup, here you will see a link “result“ click on it. It will show you a list with all templates.
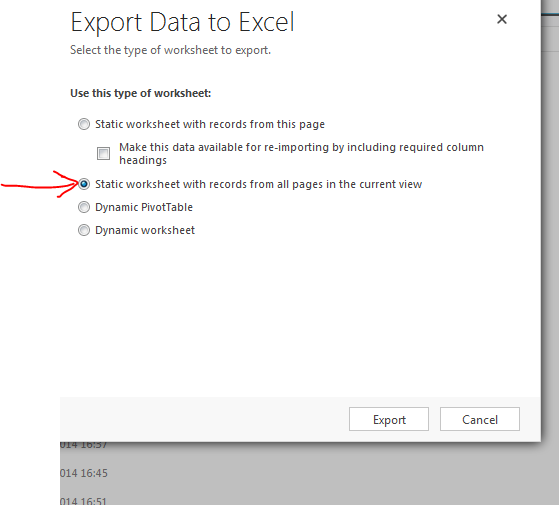
Now go to “Export Templates” link and click as well. Please save exported file as CSV file type.
See Below Screen:

- Please select second option “Static worksheet with records from all pages in the current view”.
See Below Screen:
 c) **(At Server1)** Now go to again at the server on which you want to import Data.
- Click on “Imports“ link, you will see “IMPORT DATA” option click here.
-
A popup will open with heading “Upload Data File” here browse CSV file which we exported previously.
-
Now click on next button and at the next step you find a drop down, here you need to map the record with your desired entity i.e. “Templates”.
-
On next step you are able to allow duplicate record or whatever you want.
I will be very grateful if its help us even a little bit.

